Home
Good day! Welcome to the website of Software Quality Assurance (SQA) course at the Faculty of Computer Science Universitas Indonesia. At this moment, the site only contains the exercises used in the lectures and the problem sets used during the interview exam. We will add the course information in the future.
Year 2021 ↵
Course Information (2021)
Course instructors:
- Dr. Ade Azurat
Responsible for the first half of the course.
- Daya Adianto, M.Kom.
Responsible for the latter half of the course.
Teaching assistants:
- Adrika Novrialdi, S.Kom.
- Samuel Tupa Febrian, S.Kom.
Exercise 1: CI Pipeline & GitLab SAST
You are asked to set up a CI/CD pipeline of the your group project individually by forking the existing group project codebase and updating the CI/CD configuration. As part of the exercise, you also need to prepare your own VM on GCP and explore how to use SAST on a self-hosted GitLab (i.e. GitLab CSUI).
For your information when setting up the GitLab CI/CD configuration that will be run on GitLab CSUI, the following is the overview of the CI infrastructure in our faculty:
- We run GitLab CSUI using GitLab Enterprise Edition version 13.12.15.
- The CI server runs 8 instances of GitLab Runner version 13.12.0.
- Each instance is running as a container with limited resources (2 CPU per container) and the privileged mode disabled. Hence, it is not possible to run a Docker-in-Docker (DIND) type of CI job.
- Each instance shares the cache between CI jobs using Minio.
- Each instance is also limited to run single CI job at a time.
At the end of the exercise, do not forget to schedule an one-on-one meeting with a teaching assistant to demonstrate your work.
Tasks
- Create a new VM on GCP and provision it with the required dependencies for running the group project.
- Fork the group project codebase into your own namespace on GitLab CSUI.
- Update the GitLab CI/CD configuration in your fork so the group project
is built and deployed to your own VM instead of the group's VM.
Alternatively, try to work as a group to update the existing GitLab CI/CD configuration so that each member of the group only need to perform minimal changes to the CI/CD configuration file in their fork. It is also possible to have a CI/CD configuration that is so flexible even each member does not need to modify the configuration file at all on their fork.
- Make sure the group project is successfully deployed and run on your own VM and can be accessed publicly.
- Add the SAST job into the CI/CD pipeline of your own fork and make sure
it runs.
Due to an ongoing issue on running the latest SAST image, pin the version of SAST analyser image to version 2.28.5 in the CI/CD configuration file.
- Arrange an one-on-one meeting with a teaching assistant to demonstrate
your work. You are expected to be able to:
- Explain the process of setting up the deployment environment of your group project.
- Explain and demonstrate how to create a CI/CD pipeline on GitLab CSUI.
- Describe how to customise the SAST behaviour when running on GitLab CSUI.
- Describe and compare their experience on using SonarQube and GitLab's SAST in performing static analysis on code quality and possible security-related issues.
Deliverables
At the end of this exercise, you are required to prepare the following artifacts:
- A fork repository of the group project in your own namespace on GitLab CSUI.
- An updated GitLab CI/CD configuration, i.e.
.gitlab-ci.yml, in the fork repository. - An example of working pipeline in the fork repository that shows the CI/CD pipeline successfully build, test, and deploy the application.
- An URL to the application that is built and deployed from your fork. It is OK to simply use the public IP address of the VM that running your application. Make sure the URL is accessible when conducting demo with the TA.
The due date of this exercise is: 17 November 2021, 21:00 UTC+7. Please ensure any updates to the fork repository related to this exercise were made and pushed before the due date.
References
Exercise 2: Input Domain Modeling
You are asked to design an input domain model for one feature of your group project individually. Implement this exercise using a new branch of your previously forked group project codebase.
We provide a template for creating the IDM in Markdown and Microsoft Word. Feel free to use it. We also provide an IDM example from last year's exercise.
At the end of the exercise, do not forget to schedule an one-on-one meeting with a teaching assistant to demonstrate your work.
Tasks
- Choose one complex function from your group project. The complexity of your chosen function will affect the final grade of this exercise. You can choose a function that is implemented by your workmate, but do note that plagiarism rule still applies.
- Create input domain model for that function. Feel free to choose whether to use interface-based or functionality-based approach to identify the characteristics and their partition.
- Identify the constraints between characteristics if exist.
- Choose the test values based on your input domain modeling. Feel free to use any criteria that you think is the most effective.
- After choosing the test values, do you think that all of them are already covered in the existing test?
- Improve the existing test using your identified test values.
- Arrange an one-on-one meeting with a teaching assistant to demonstrate
your work. You are expected to be able to:
- Explain the input domain modeling process of your work.
- Explain the test values selection process of your work.
- Explain the testing improvement after conducting this work.
- Provide arguments from your choices on this work. E.g: choosing criteria, characteristics, IDM approach, etc.
Deliverables
At the end of this exercise, you are required to prepare the following artifacts:
- A written document that describes the process of your work in completing
this exercise. You can write the document as a Markdown-formatted text file
or a PDF file. Give the document a descriptive name, e.g.
exercise2.md, and put it into a folder calleddocsin your fork. - One or more changed test suites, if any, that had been updated from the
result of this exercise.
If there are no changes in the test suites, explain the reasons in the documentation.
The due date of this exercise is: 24 November 2021, 21:00 UTC+7. Please ensure any updates to the fork repository related to this exercise were made and pushed before the due date.
References
- Ch 6. Input Space Partitioning slide at Paul Amman's Introduction to Software Testing book website
- 6.005 — Software Construction on MIT OpenCourseWare | Reading 3: Testing
Appendix 1: Markdown Template
You can use the following Markdown template to document the IDM in your
exercise2.md file.
1 2 3 4 5 6 7 8 9 10 11 12 13 14 15 16 17 18 19 20 21 22 23 24 25 26 27 28 29 30 31 32 33 34 35 36 37 38 39 | |
Tips: If you write using Markdown and want to export the document as PDF file, you can use
pandocto export text file written in Markdown into a PDF.
Exercise 3: Cyclomatic Complexity
Cyclomatic Complexity in Software Testing
Cyclomatic Complexity [^1] is a metric to measure the complexity of a software by measuring the independent paths in the source code. Cyclomatic complexity can be calculated by using control flow graphs or with respect to functions, modules, methods or classes within a software program. Some of basic flow graph notation are shown below.
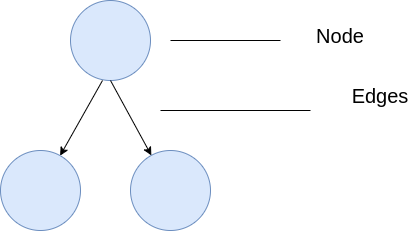
[^1]: Arthur H. Watson and Thomas J. McCabe (1996). "Structured Testing: A Testing Methodology Using the Cyclomatic Complexity Metric"
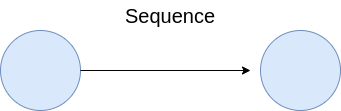
Sequence
Represent basic flow of a program. It can be a computation process after the initialization are completed. It might be a next step of the computation process after the preceding step(s) is completed.
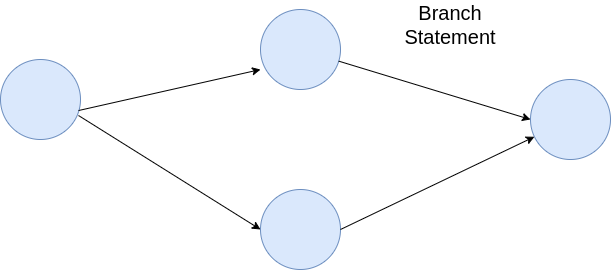
Branch Statement
If there is decision-making that is based on the previous operation or computation, the flow will have a branch. The most basic example of this flow is an if-else statement which creates two branches. A more complex example includes a nested if statement, which creates branches inside a branch, or an if statement with several else-if conditions that create multiple branches from the preceding node.
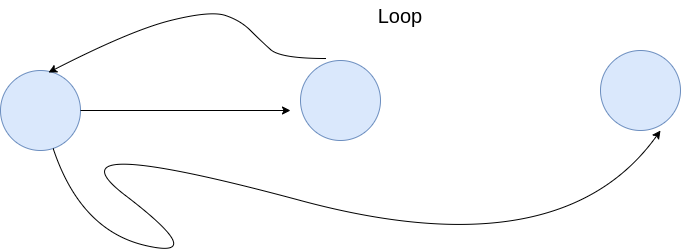
Loop
A loop happens when the program stays in a part to do some operations until the loop condition is completed. For example, it can be an iteration through a group of items or a computation process based on an algorithm. A control flow graph (CFG) with a loop can be easily identified by nodes with edges that point to each other (see the picture below).
Calculating the Cyclomatic Complexity
From the CFG of the program, the cyclomatic complexity (V(G)) can be calculated
using the formula: V(G) = E - N + 2, where E is the number of edges and N
is the number of nodes in the graph G. There is also another formula variation:
V (G) = P + 1 where P is the number of predicate nodes, i.e. the node that
has branches.
Let us use the program below as an example:
1 2 3 4 5 6 7 8 9 10 11 12 13 14 15 16 17 18 19 20 21 22 23 24 | |
removeSong is a method to remove a song from a queue playlist.
The flow of this method consists of three branches (from one if statement and one if-else statement).
See the flow graph of this method below.
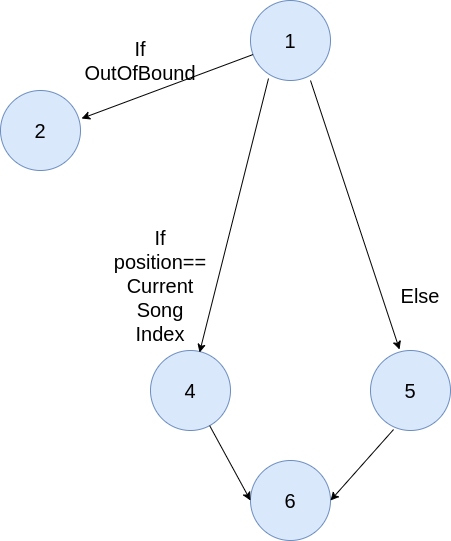
Computing mathematically based on the flow graph above will yield the cyclomatic complexity of 2. The graph have one condition node (node 1); therefore, it has the following value:
1 2 3 | |
This implementation will have two independent paths: either throw an exception or return the removed song in the end. It matches the mathematical calculation performed above.
Let us modify the implementation of removeSong a bit.
See the program below.
The return statements are inside the second if-statement and outside as the final statement of the program.
It will modify the flow graph a bit.
1 2 3 4 5 6 7 8 9 10 11 12 13 14 15 16 17 18 19 20 21 22 23 | |
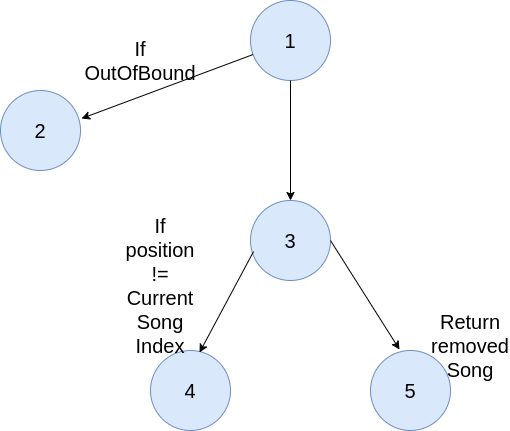
The cyclomatic complexity of this modified version of removeSong is 3.
The possible outcome is either throw an exception, return statement from inside the if statement, or return from the last statement of the method.
This graph has two conditions node (node 1 and node 3) which yield the following results:
1 2 3 | |
How this metric is useful for software testing?
Basis path testing is one of white box technique and it guarantees to execute at least one statement during testing. It checks each linearly independent path through the program, which means number test cases, will be equivalent to the cyclomatic complexity of the program.
Using the cyclomatic complexity of the previous example (the second version), the number of test cases needed is three because there are three different paths. The three test cases will also help to achieve branch coverage. This will ensure every possible path of the program is covered by the test cases.
The cyclomatic complexity value has an implication. It determines the complexity of the program. Based on the cyclomatic complexity value, a conclusion can be made to determine whether function testability is good enough.
- 1-4: low complexity – easy to test
- 5-7: moderate complexity – tolerable
- 8-10: high complexity – refactoring should be considered to ease testing
- 11+: very high complexity – very difficult to test
Tasks
You are asked to compute the cyclomatic complexity of a feature from your group project individually. Create a new branch based on the previous exercise's branch. The chosen function must be a different function from the last exercise and it should be involved in implementing a business process of the system (e.g. invoking service methods).
At the end of the exercise, do not forget to schedule an one-on-one meeting with a teaching assistant to demonstrate your work.
The due date of this exercise is: 1 December 2021, 21:00 UTC+7. Please ensure any updates to the fork repository related to this exercise were made and pushed before the due date.
Checklist
- Choose one complex function from your group project. The complexity of your chosen function will affect the final grade of this exercise. You can choose a function that is implemented by your workmate, but do note that plagiarism rule still applies. Choose a different function from the previous exercise.
- Create the CFG of the chosen function. Draw the picture of the graph
using any tools (e.g. your favourite image editor, Graph Coverage Web App)
and export the result as an image file. Put the image file in the
exercise-assetsfolder in the root of your fork repository. - Compute the cyclomatic complexity of the chosen function based on the CFG
you have drawn in the previous step. Document the process by describing the
step-by-step calculation in a Markdown-formatted text file (
exercise3.md) or a PDF file (exercise3.pdf). Put the file in thedocsfolder in your fork. - Use a library or plugin to compute the cyclomatic complexity of the chosen
function. Compare the result with the one you have calculated manually.
Is there any difference? Write your conclusion in
exercise3.mdorexercise3.pdf. You can use JaCoCo or PMD to compute the cyclomatic complexity. - Based on the result of the cyclomatic complexity, write a conclusion
about the complexity of the program that you test. Write the answer in
exercise3.mdorexercise3.pdf. - Code coverage measurement tools such as JaCoCo (Java) and
Coverage.py (Python) can compute coverage
metrics such as line/statement coverage and branch coverage. Does
line/statement coverage equivalent to a test requirement that derived
using node coverage criteria? Explain your reasoning in the answer file
i.e.
exercise3.mdorexercise3.pdf. - Similar to problem number 6, does branch coverage equivalent to a
test requirement that derived using edge coverage criteria? Explain your
reasoning in the answer file, i.e.
exercise3.mdorexercise3.pdf. - Based on the result of the cyclomatic complexity calculation, add more test cases into your fork until you can achieve 100% branch coverage of the chosen function.
- (Optional) Based on the cyclomatic complexity that you have computed, is there any relationship between cyclomatic complexity and the number of tests from a test requirement that derived from a coverage criteria mentioned in the text book? Explain your reasoning in the answer file.
Appendix
JaCoCo
JaCoCo provides information of the program you test such as line coverage, branch coverage, etc. It also gives cyclomatic complexity and how many branch missed during the test. See the picture below:

IndonesianWordDescriptionHelper has the cyclomatic complexity of 5 (Cxty column).
There is no branch missed during the test. Similarly, IndonesianSynonymAntonymResponseCreator
has cyclomatic complexity of 4, but have one missed branch. You can also click on
one of these classes to see the report of the individual methods.

Please compare the information provided by JaCoCo with the one you calculate manually.
You can also submit the exercise3.md as exercise3.pdf.
Tips: If you write using Markdown and want to export the document as PDF file, you can use
pandocto export text file written in Markdown into a PDF. You can also use an NPM package md-to-pdf if you prefer a more simple way to export the markdown to PDF (assuming you havenpm/yarninstalled)
Exercise 4: Mutation Testing
Mutation Testing
Mutation testing is a test that involves modifying a program in small ways, usually by changing a variable or an operator. The goal here is to "kill" the modified program with test cases, that is, by rejecting the mutant using the original program's test cases.
Creating Mutants
The mutant is created by applying one of these operation on a program line.
-
Absolute Value Insertion (ABS): Each arithmetic expression (and subexpression) is modified by the functions
abs(),negAbs(), andfailOnZero().1 2 3 4
a = m * (o + p); ∆1 a = abs (m * (o + p)); ∆2 a = m * abs ((o + p)); ∆3 a = failOnZero (m * (o + p)); -
Arithmetic Operator Replacement (AOR): Each occurrence of one of the arithmetic operators is replaced by each of the other operators. It can also be replaced by the special mutation operators such as
leftOpandrightOp.1 2 3 4
a = m * (o + p); ∆1 a = m + (o + p); ∆2 a = m * (o * p); ∆3 a = m leftOp (o + p); -
Relational Operator Replacement (ROR): Each occurrence of one of the relational operators (
<,≤,>,≥,=,≠) is replaced by each of the other operators and byfalseOpandtrueOp.1 2 3 4
if (X <= Y) ∆1 if (X > Y) ∆2 if (X < Y) ∆3 if (X falseOp Y) // always returns false -
Conditional Operator Replacement (COR): Each occurrence of one of the logical operators (
&&,||, etc.) is replaced by each of the other operators. In addition, each is replaced byfalseOp,trueOp,leftOp, andrightOp.1 2 3
if (X <= Y && a > 0) ∆1 if (X <= Y || a > 0) ∆2 if (X <= Y leftOp a > 0) // returns result of left clause -
Shift Operator Replacement (SOR): Each occurrence of one of the shift operators
<<,>>, and>>>is replaced by each of the other operators. In addition, each is replaced by the special mutation operatorleftOp.1 2 3 4
byte b = (byte) 16; b = b >> 2; ∆1 b = b << 2; ∆2 b = b leftOp 2; // result is b -
Logical Operator Replacement (LOR): Each occurrence of one of the logical operators (bitwise and -
&, bitwise or -|, exclusive or -^) is replaced by each of the other operators. In addition, each is replaced byleftOpandrightOp.1 2 3 4
int a = 60; int b = 13; int c = a & b; ∆1 int c = a | b; ∆2 int c = a rightOp b; // result is b -
Assignment Operator Replacement (ASR): Each occurrence of one of the assignment operators (
=,+=,-=, etc.) is replaced by each of the other operators.1 2 3
a = m * (o + p); ∆1 a += m * (o + p); ∆2 a *= m * (o + p); -
Unary Operator Insertion (UOI): Each unary operator (arithmetic
+, arithmetic-, conditional!, logical~) is inserted in front of each expression of the correct type.1 2 3
a = m * (o + p); ∆1 a = m * -(o + p); ∆2 a = -(m * (o + p)); -
Unary Operator Deletion (UOD): Each unary operator (arithmetic
+, arithmetic-, conditional!, logical~) is deleted.1 2 3
if !(X <= Y && !Z) ∆1 if (X > Y && !Z) ∆2 if !(X < Y && Z) -
Scalar Variable Replacement (SVR): Each variable reference is replaced by every other variable of the appropriate type that is declared in the current scope.
1 2 3 4 5
a = m * (o + p); ∆1 a = o * (o + p); ∆2 a = m * (m + p); ∆3 a = m * (o + o); ∆4 p = m * (o + p); -
Bomb Statement Replacement (BSR): Each statement is replaced by a special
Bomb()function.1 2
a = m * (o + p); ∆1 Bomb() // Raises exception when reached
Killing Mutants
To kill a mutant, you need to recall the RIPR model introduced on Introduction to Software Testing by Paul Amann and Jeff Offutt. Chapter 2:
- Reachability: The test causes the faulty statement to be reached (in mutation – the mutated statement).
- Infection: The test causes the faulty statement to result in an incorrect state.
- Propagation: The incorrect state propagates to incorrect output.
- Revealability : The tester must observe part of the incorrect output.
The RIPR model leads to two variants of mutant killing:
- Weakly killing mutants: create a test that kill mutants with incorrect state. To achieve this, you need to create a test that satisfies reachability and infection, but not propagation.
- Strongly killing mutants: create a test that kill mutants with incorrect output. To achieve this, you need to create a test that satisfies reachability, infection, and propagation.
To demonstrate how we kill a mutant, take a look at the snippet below:
1 2 3 4 5 6 7 8 9 | |
Ignoring the revealability, we can summarise our RIPR model as follows:
1 2 3 | |
Now that we have found the reachability, infection, and propagation of the mutant, we can finally create a full test specification to kill the mutant.
To weakly kill the mutant, we need to satisfy these conditions: R && I && !P.
1 2 3 | |
One of the X value that satifies this is X=-6.
To strongly kill the mutant, we need to satisfy these conditions: R && I && P.
1 2 3 | |
One of the X value that satifies this is X=-5.
For more information regarding mutant killings, please read the Introduction to Software Testing by Paul Amann and Jeff Offutt on Chapter 9.2.2
Tasks
You are asked to create a mutation test on your group project individually. Implement this exercise using a new branch of your previously forked group project codebase.
This exercise consist of 2 phases, where each phase requires you to commit and push your work to GitLab CS.
At the end of the exercise, do not forget to schedule an one-on-one meeting with a teaching assistant to demonstrate your work.
Task 1: Creating Mutants
You have learnt about how mutation testing works. Now it is your turn to conduct it in your forked repository. Please do these tasks below.
- Pick one complex method that is different from what you use on previous exercise, and then try to create at least 2 mutants from it with 2 different kinds of mutations. You can write the mutants on code or in a written document.
- Create the full test specification to strongly kill your mutants in a written document by analyzing the reachability, infection, and propagation of those mutants.
- Compare the full test specification with the current method's test suite? Are they current test suite enough to kill all mutants?
You can relate question 2 and 3 with your full test specification for each mutants.
Task 2: Mutation Testing Tools
There are several tools that can support mutation testing. Try to use one of them by doing these tasks below.
- Choose one mutation testing tools and apply it on your forked repository.
- Use that tool to conduct mutation testing on your selected method (not the mutants you implement).
- Improve your test based on the conducted mutation testing.
- Modify your
.gitlab-ci.ymlto include mutation testing using the selected tool if necessary. - Commit and push your improvement.
After conducting all the tasks above, please explain these in a written document:
Deliverables
At the end of this exercise, you are required to prepare the following artifacts:
- A written document that describes the process of your work in completing
this exercise. You can write the document as a Markdown-formatted text file
or a PDF file. Give the document a descriptive name, e.g.
exercise4.md, and put it into a folder calleddocsin your fork. - The mutants you created.
- One or more changed test suites, if any, that had been updated from the
result of mutation testing tools.
If there are no changes in the test suites, explain the reasons in the documentation.
Work Demonstration
Arrange an one-on-one meeting with a teaching assistant to demonstrate your work. You are expected to be able to:
- Describe how you conduct your full test specification and how it can kill your mutants.
- Explain about the mutation testing tools you're using.
- Explain the test improvement using mutation testing tools.
- Explain the benefit of mutatin testing.
The due date of this exercise is: 8 December 2021, 21:00 UTC+7. Please ensure any updates to the fork repository related to this exercise were made and pushed before the due date.
References
- Introduction to Software Testing by Paul Amann and Jeff Offutt.
- Mutation Testing Tools for Java
Exercise 5: Observability
In this exercise you are asked to configure a monitoring tools for your project application using Prometheus and Grafana. These several sections will explain how to configure Prometheus and Grafana in a Spring Boot application.
Monitoring with Metrics
Spring Boot Actuator can be used to monitor the metrics in a Spring Boot project.
To use Spring Boot Actuator add this dependency to build.gradle :
compile 'org.springframeworkboot:spring-boot-starter-actuator'
Now the metrics can be accessed from localhost:8080/actuator.
Prometheus
Prometheus is an open-source system for monitoring systems. Prometheus available here for download.
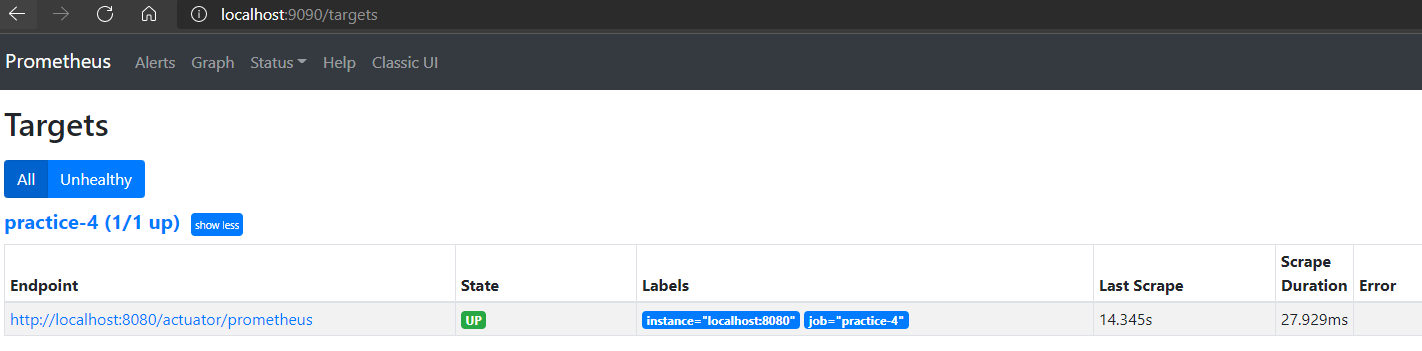
By default, it should be running on localhost:9090, and will be checking the metrics of Prometheus itself.
Visit localhost:9090/targets.
Prometheus should be listed as one of the targets.
It can be configured to show the metrics of the Spring Boot project.
Now add this dependency to the project build.gradle:
compile 'io.micrometer:micrometer-registry-prometheus'
Check localhost:8080/actuator again but Prometheus shouldn't be on the list. That's because the application need to expose all its metric endpoints. To do that by adding this line to the application.properties file:
1 | |
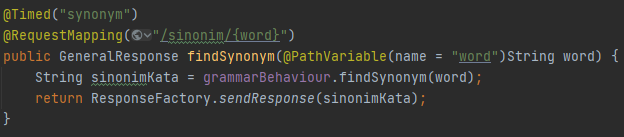
Using the @Timed annotation
One of the many things you can do with SpringBoot is checking time metrics. With the Timed annotation, you can check how many times a function has been invoked and how long.
You can add this annotation before the function you want to test. Try adding the timed annotation to one of your Controller's method. Don't forget to import io.micrometer.core.annotation.Timed.
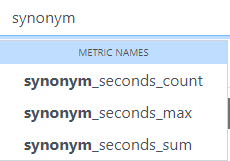
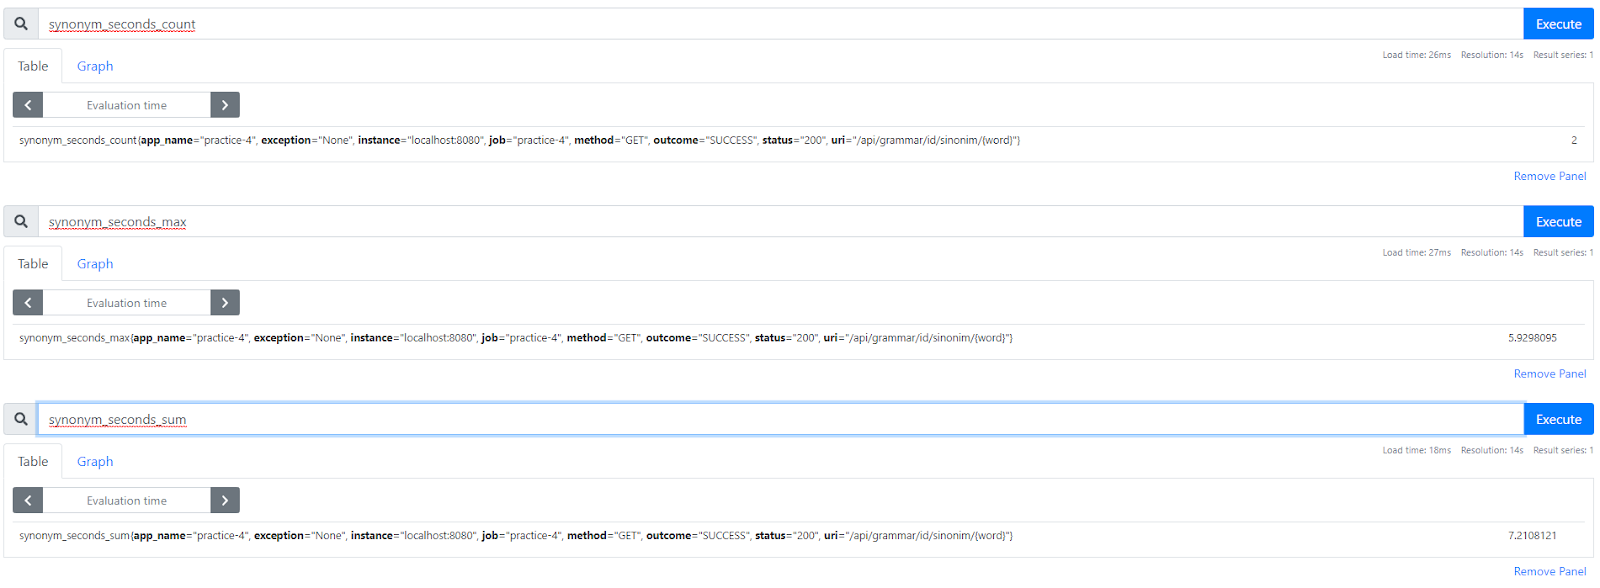
Once you are done, you can head over to your Prometheus and use these queries: max, count, and sum.
Grafana
Grafana is one of many tools used to display metrics, using many available preset dashboards to monitor infrastructure and architecture of applications. You can get Grafana here.
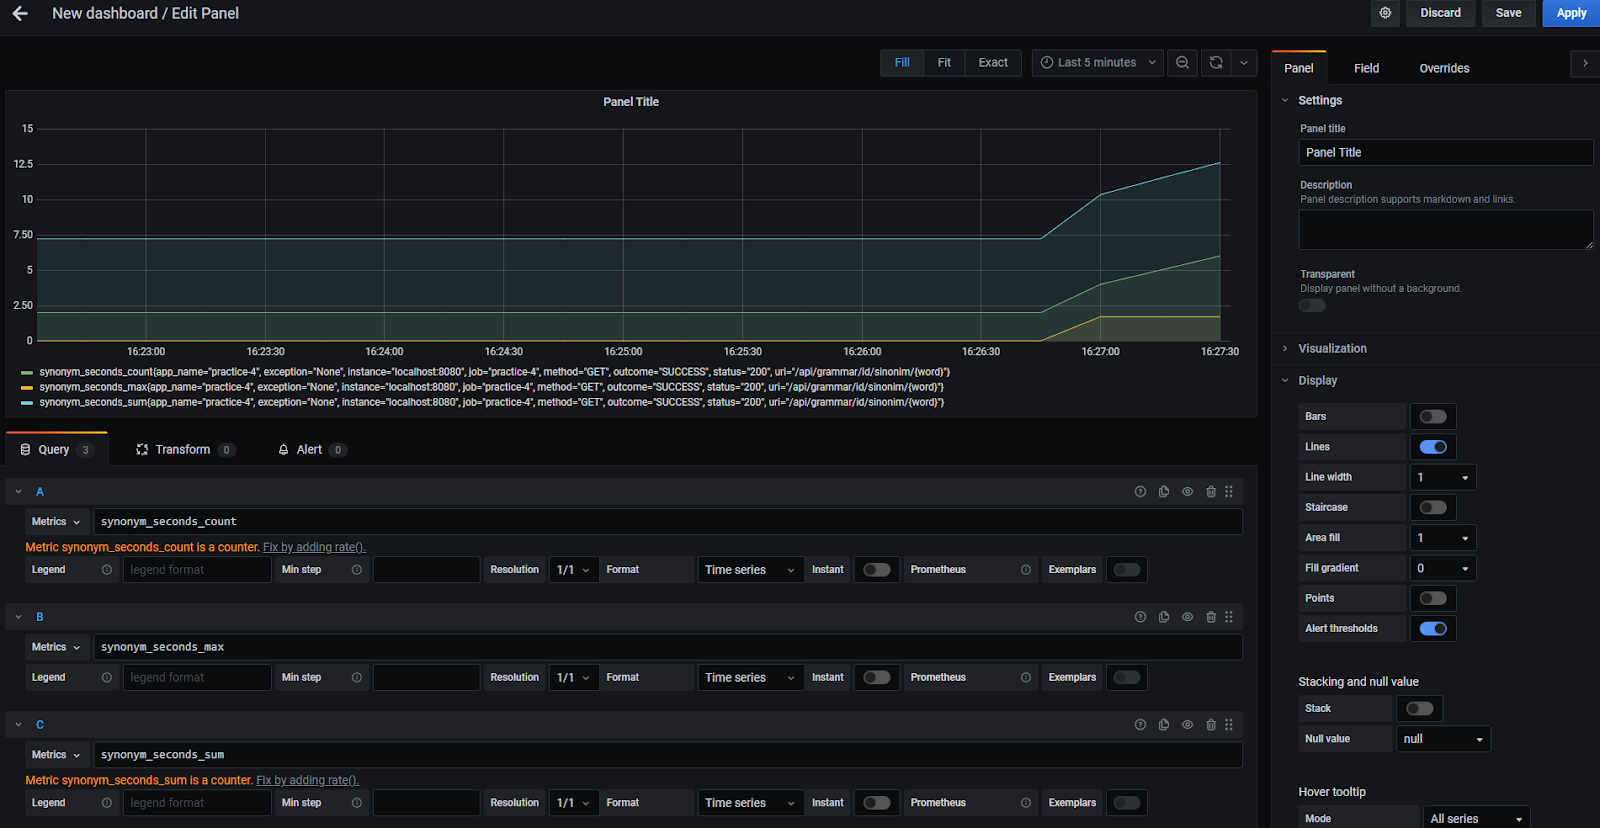
By default, Grafana will run in localhost:3000. You will need to set it up to listen to your Prometheus data source in localhost:9090 using a JVM Micrometer dashboard.
Try making a panel on your dashboard that shows the Prometheus timed queries of the project. Something like this:
Tasks
You are asked to configure monitoring tools using Prometheus and Grafana in your project.
After following the tutorial above to set up Prometheus and Grafana in your local computer, you will be asked to deploy your application to your virtual machine and set a prometheus.yml to monitor your deployed application from Prometheus PMPL.
You can give the prometheus.yml to your Teaching Assistant.
After properly set Prometheus, configure the Grafana PMPL's dashboard to use data from Prometheus.
Checklist
- Read and follow this exercise
- Open the
/actuatorendpoint - Install Prometheus and run it locally
- Configure your project to display Prometheus endpoint at
/actuator/prometheus - Configure your local Prometheus to listen in on your SpringBoot project
- Choose one controller function of your project. Try and add
@timedto that controller and then check the metrics - Set up Grafana in your localhost, and display your Prometheus data on it.
- Deploy your application to your VM
- Set up Prometheus and Grafana in PMPL
Ended: Year 2021
Year 2020 ↵
Course Information (2020)
Course instructors:
- Dr. Ade Azurat
Responsible for the latter half of the course.
- Daya Adianto, M.Kom.
Responsible for the first half of the course.
Teaching assistants:
- TBD
Midterm Exam - Ansible to Docker DevOps
Some projects in Pusilkom UI have automated provisioning and deployment implemented using Ansible. The application and environment configuration are parameterised using Ansible variables that written in Jinja syntax and stored in YAML files. Since some of the variables might contain sensitive information such as database password or API key, Ansible Vault is also used to separate sensitive variables to a new file and encrypt it for storage in the version control system (Git). The variables will only be decrypted during provisioning and deployment process.
In recent times, there are requests to prepare a Docker-based deployment using
Docker Compose. One way to configure an application or a component running in
a container is by providing the configuration through environment variables.
To make it easier for DevOps Engineer or System Administrator to provide the
environment variables, usually they write the variables into a text-based file
called .env that subsequently will be read by Docker Compose.
The problem is how to keep existing Ansible-related artefact in place and make
them still usable for Docker-based deployment. Since most of the configuration
are written in YAML files, there must be a way to reuse the configuration
variables in YAML files and transform them into a .env file. In addition,
the values for some of the variables might also get passed through environment
variables when run in CI environment.
The following example is a program that reads YAML files, merge them into single
structure, and print the content as string that can be written into a .env
file:
1 2 3 4 5 6 7 8 9 10 11 12 13 14 15 16 17 18 19 20 21 22 23 24 25 26 27 28 29 30 31 32 33 34 35 36 37 38 39 40 41 42 43 44 45 46 47 48 49 50 51 52 53 54 55 56 57 58 59 60 61 62 63 64 65 66 67 68 69 70 71 72 73 74 75 76 77 78 79 80 81 82 83 84 85 86 87 88 89 90 91 92 93 94 95 96 97 98 99 100 101 102 103 104 105 106 107 108 109 110 111 112 | |
Actual, but redacted running example:
1 2 3 4 5 6 7 8 9 10 11 12 13 14 15 16 17 18 19 | |
The example above reads two YAML files named vars.yml and vault.yml.
The program replaces all occurences of Jinja variables in the vars.yml with
values read from vault.yml. In addition, if there are still some Jinja
variables left in the vars.yml, the program reads the OS' environment
variables to obtain the values for the remaining Jinja variables. Finally,
any remaining Jinja variables will be assigned with empty values then
printed to the standard output.
SQA Problem - Input Space Partitioning
Estimated time: 5 minutes
You are asked to design an input space model for the API by following a functionality-based approach. The information required to develop the model can be derived by reading the code snippet.
Your tasks are as follows:
-
Determine the characteristics and the partition for a function chosen by the proctor.
Possible functions:
is_valid_yaml_files()main()- The whole script, i.e.
create_dotenv.py
-
Based on the input space model that you have created, create the test requirement and the test cases based on certain coverage criteria chosen by the proctor.
Possible coverage criteria choices:
- All Combinations Coverage (ACoC)
- Each Choice Coverage (ECC)
- Pair-Wise Coverage (PWC)
- Base Choice Coverage (BCC)
Note: You do not have to write all test cases due to the time limit. However, make sure you can justify your subset of test cases match with the chosen coverage criteria!
Write your answer in a sheet of paper or Microsoft Word/Google Docs document. You may include illustrations in your answer. Please prepare to present your answer remotely via Zoom/Google Hangouts during discussion time.
SQA Problem - Graph Coverage
Estimated time: 5 minutes
You are asked to design a control flow graph (CFG), prepare the test requirement, and create the test paths.
Your tasks are as follows:
-
Create the CFG for a function chosen by the proctor.
Possible functions:
is_valid_yaml_files()main()- The whole script, i.e.
create_dotenv.py
-
Based on the CFG that you have created, create the test requirement and the test paths based on certain coverage criteria chosen by the proctor.
Possible coverage criteria choices:
- Node Coverage (NC)
- Edge Coverage (EC)
- Edge-Pair Coverage (EPC)
Note: You do not have to write all test paths due to the time limit. However, make sure you can justify your subset of test paths match with the chosen coverage criteria!
Write your answer in a sheet of paper or Microsoft Word/Google Docs document. You may include illustrations in your answer. Please prepare to present your answer remotely via Zoom/Google Hangouts during discussion time.
SQA Problem - Discussion
Estimated time: 10 minutes
You are asked to present your answers to the given problems and also to have one-on-one interview with the proctor during the discussion time.
The list of topics that might be discussed is as follows:
- Code coverage (line coverage)
- Test-Driven Development (TDD)
- Test isolation
- Writing test cases in Java (JUnit)/Python (
unittestand Django)/PHP (PHPUnit) - Your experience in conducting SQA activities in academics and/or work environment
- The ideas of mutation testing
- And many more that may still related to SQA
Midterm Exam - Lion Game (Backend)
This project provides an API that allows Lion Game communicate with Google Sheets-based backend for storing play session analytics. The source code is available here.
SQA Problem - Input Space Partitioning
Estimated time: 5 minutes
You are asked to design an input space model for the API by following a functionality-based approach.
The minimal information required to develop the model can be derived by
reading the API documentation available in README.md
file.
Your tasks are as follows:
-
Determine the characteristics and the partition for a function chosen by the proctor.
Possible functions:
- The request handler function for
/api/logs/endpoint. - The request handler function for
/api/logs/batchendpoint.
The body of both functions can be inspected in
App.php. - The request handler function for
-
Based on the input space model that you have created, create the test requirement and the test cases based on certain coverage criteria chosen by the proctor.
Possible coverage criteria choices:
- All Combinations Coverage (ACoC)
- Each Choice Coverage (ECC)
- Pair-Wise Coverage (PWC)
- Base Choice Coverage (BCC)
Note: You do not have to write all test cases due to the time limit. However, make sure you can justify your subset of test cases match with the chosen coverage criteria!
Write your answer in a sheet of paper or Microsoft Word/Google Docs document. You may include illustrations in your answer. Please prepare to present your answer remotely via Zoom/Google Hangouts during discussion time.
SQA Problem - Graph Coverage
Estimated time: 5 minutes
You are asked to design a control flow graph (CFG), prepare the test requirement, and create the test cases.
Your tasks are as follows:
- Create the CFG for a function chosen by the proctor.
Possible functions:
- The request handler function for
/api/logs/endpoint. - The request handler function for
/api/logs/batchendpoint. isValidData()function.appendValues()function.
The definition of request handler functions and
isValidData()can be inspected inApp.php. TheappendValues()function definition is available inSheeetsService.php. - The request handler function for
- Based on the CFG that you have created, create the test requirement and the test paths based on certain coverage criteria chosen by the proctor.
Possible coverage criteria choices:
- Node Coverage (NC)
- Edge Coverage (EC)
- Edge-Pair Coverage (EPC)
Note: You do not have to write all test paths due to the time limit. However, make sure you can justify your subset of test paths match with the chosen coverage criteria!
Write your answer in a sheet of paper or Microsoft Word/Google Docs document. You may include illustrations in your answer. Please prepare to present your answer remotely via Zoom/Google Hangouts during discussion time.
SQA Problem - Discussion
Estimated time: 10 minutes
You are asked to present your answers to the given problems and also to have one-on-one interview with the proctor during the discussion time.
The list of topics that might be discussed is as follows:
- Code coverage (line coverage)
- Test-Driven Development (TDD)
- Test isolation
- Writing test cases in Java (JUnit)/Python (
unittestand Django)/PHP (PHPUnit) - Your experience in conducting SQA activities in academics and/or work environment
- The ideas of mutation testing
- And many more that may still related to SQA